


10 Christmas gift ideas that patchworkers will love.
/
Christmas presents for the patchworker in your life.
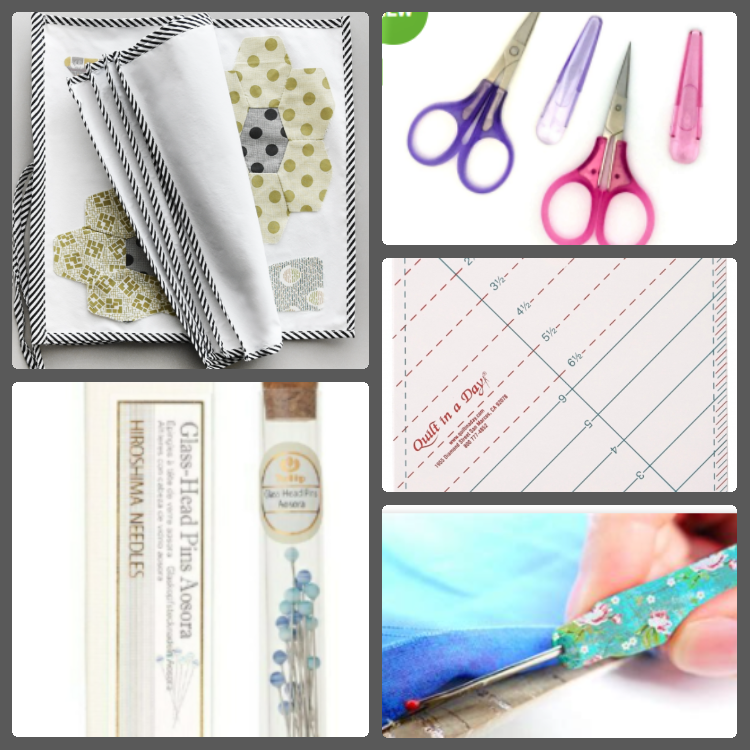
1. Jen Kingwell’s Block Wrap. A great gift for any patchworker who travels or who takes hand sewing with them everywhere they go. (that’s me, going to an appointment, sew in the waiting room, any time is sewing time.)
2. Quilt in a Day 6 ½ “triangle square up ruler. This ruler is a must when making half-square-triangles and every patchworker at some time makes H-S-T.
3. Fine pigment pen for writing on labels, no quilt is truly finished until it has a label. Available a stationary supply store.
4. Mechanical pencil with 2B refills. These pencils give a lovely fine line when tracing and drawing around templates which then equals better accuracy. Available a stationary supply store.
5. Sandpaper board for when drawing around templates. This stops the fabric moving as you draw around the template and also helps give a darker pencil line.
6. Good quality pins. I know you might think pins are pins but they are not. Nice fine pins leave a smaller hole and damage fabric less. Well worth the extra few dollars. I like Tulip glass head pins.
7. A very distinctive seam ripper like this one from Moore’s. We don’t like to admit it but we all do make mistakes at time. The reason I like a distinctive one is so when I am sewing in a group I know exactly which seam ripper is mine.
8. Nice fine scissors for the smaller jobs. These ones from The Scissor Man are inexpensive, small for travel and have a protective cover, no getting stabbed when you put your hand in your bag.
9. A Jelly Roll or a Fat ¼ pack of fabric that you like will always be appreciated, and who knows you might even get it gifted back to you in the shape of a quilt.
10. One of my books. I have a children’s book “My Grandma makes patchwork quilts”, a cute story about a Grandma and Grandchild’s shared love of fabric and play. I also have a book to replace a card when giving a quilt as a gift. Check them out on my website: Nest of Quilts
I hope this helps with the Christmas shopping. The truth is whatever you give if it is given with love and thought it will be loved.
I hope you have a safe and merry Christmas.
Oh no I missed Christmas
/
Oh no I missed Christmas, in July. No problem, Christmas in December is just around the corner.
I have never understood why we celebrate Christmas in July and not June which is the half way mark. Maybe I need to Google the history of why. Anyway with COVID and lockdowns Christmas in July did not happen for me or any of my friends.
So now we have the real Christmas just around the corner and it is time to start preparing. I have put together some website address where you will find easy, inexpensive and cute decoration to make for the tree or to add to a gift. I like to wrap Christmas presents in plain paper then add a decoration on the outside to jazz it up.
There are fabric decoration that the receiver can keep for years to come, thinking of you each year as they place it on their tree and there are paper ones that might only last a week or two. No matter which you choose to make and give the receiver will delighted.
Enjoy
Why is patchwork so popular?
/
Antique quilt
Why oh why is patchwork so popular.
Very good question. Is there a definitive answer? I don’t know but here are my thoughts.
It was popular years ago because it filled a domestic need, to keep you warm on cold winter’s nights in a home that possible was very drafty. Quilts were made from left over fabric from worn clothes, seed bags etc so cheap to make and all the requirements were on hand. Necessity made it popular.
Fast forward to today. Quilts still fulfil their primary purpose, keep us warm but they do so much more now. We now buy fabric specifically for a quilt, we have access to patterns, batting and sewing machines. So yes we can, if we choose, make them quicker and easier that our for-fathers but why do we still make quilts when we could go out and buy them.
We, like those patchworkers that have gone before us, want to express our creativity. A lot of what we do, on a daily basis, we repeat over and over again eg we wash dirty clothes, hang them on the line, fold them, then they are worn again and need washing again. On and on and on it goes. We make a quilt and it stays made. Our creativity, talent and love is there for all to see. There is a saying “ it’s cheaper than therapy” and yes it is and you have a quilt to comfort you, win, win.
Patchwork is mindful, calming, fulfilling in a time when we all seem to be busy, rushing around chasing our tails. Maybe it’s popularity stems from a need to slow ourselves down, enjoy the moment and be mindful and if anyone asks ”you are sewing” and that is being productive, not wasting time or being self-indulgent. Oh if only they knew how totally self-indulgent half an hours sewing really is, just me and my fabric, priceless.
So why is patchwork so popular? Because it is the perfect self-help, me time, share with like-minded friends craft, that results in a functional item of home decor. Do you think the husband will buy that explanation when I next come home with new fabric to add to my already extensive collection? Probably not but as long as I have the patchwork bug/passion I will continue to make quilts and give quilts because they are beautiful and functional, but most importantly beautiful.
Marg
Is this Border Security?
/
Is this border security? Have I done something wrong?
I wish I was writing about International Border Security, I love the TV show, love seeing the stupid things people do, but alas COVID has stopped us travelling so I am actually writing about patchwork borders.
My patchwork group decided to do a Round Robin quilts during one of our lockdowns, and I say one because we are now in lockdown 6 and they have all started blurring together. I have recently been given my quilt back and it got me thinking, in a wakeful moment during the night, about borders, rules that should not be broken re borders and what makes a good border. Now I must say I love how my quilt has turned out and I am looking forward to putting the final border on and quilting it.
So border rules and thoughts:
1. When doing a Round Robin quilt with friends always treat the border, you are doing, as if it was for your quilt.
2. Always make the border in a length that can be divided evenly by several numbers ie don’t make it 39,57 etc because nothing divides into them evenly. I always try and give the next person a few options ie they could 4 inch or 6 inch blocks or 3 inch or 5 inch block, you know what I mean. If you do put on a border that is not divisible by a whole number you are forcing the next person to put on a plain border to make the next border divisible by a whole number. I hear you say is that really an issue, in most cases probably not but a plain border may not look right if there are no other plain borders in the quilt it may look a bit odd to suddenly have one. Or in order to get the maths right it may require a wide border which may not work with the rest of the layout.
3. I have put ½ inch borders on quilts up to an 8 inch. The size of the border, whether it is within the quilt top or an outer border, should be in balance with the rest of the quilt. Hence why point 2 is important.
4. Borders can help pull stretched quilts back into line. When measuring a quilt for a border always measure through the centre of the quilt in both directions or you can also measure the edge as well and take the average of the 2 measurements. Never just measure the edge as I have mentioned the edge might have stretched.
5. When it comes to outer borders I like to make the border either smaller or larger than the blocks it will be abutting ie if the blocks in the quilt are 8 inch then I like to make the border say 6 inches or less or 10 inches or more. It is all about balance.
6. The other thing to consider, when putting a plain outer border on a quilt, is whether to mitre the corners or not. That will all depend on the overall design of the quilt but remember to decide this prior to buying the other border fabric as there is a significant difference in how much fabric you will need.
These are my thoughts re borders, you may not agree with me and that’s ok. We all look at patchwork quilts with different eyes so what one person likes another may not. That’s why I love this art form, there are so many layouts, colour and pattern possibilities, sizes and rules to be broken.
Happy sewing
Margaret
5 quick exercises to get your patchwork mojo back.
/
I’ve lost my patchwork mojo; how do I get it back?
It has happened to all of us at some point, I think.
So what do you do when you have lost interest in patchwork and still have a room full of fabrics? Well one thing is for sure you need to find your mojo and get sewing again.
Here are 4 exercises to re-ignite your creativity or just get you feeling a little differently.
1. Look at colour. Walk outside, stop and close your eyes. Take a deep breathe, open your eyes, what is the first colour you see? Now look at the colours around that first colour. Do the surrounding colours contrast or compliment that first colour? Does the colour combination work or not? Does the colour combination make you feel happy, sad, energised, warm or cool? Grab some colouring pencils and with the help of this printable sheet document the colour combo. http://www.nestofquilts.com/cheatsheets/qtzbyqkr45rftxtevyo4anz8xosnbx
Each season has it’s colour pallet, do you have a preference?
2. Either pick up some interior design magazines from the shop, library or op shop and look at how interior designers use colour combinations. Take note of the colour that “pops” in the images and how much of it they use. Great colours to use for “pop” are black, hot pink, orange, purple, lime green and white.
3. Now that we have looked at colour and have hopefully re-ignited some creative interest let’s look at patterns. Again let’s go back to nature, in the garden. Does the garden path, the highs and lows of the planting, the clouds create patterns? Do the windows of the buildings create patterns? Now start filling in the boxes, on the sheet you printed out in exercise 1, with patterns, random lines, just doddles, don’t over think it, do it quickly maybe 2 or 3 minutes. Is there one you like, if so colour it in using one of the colour combinations from the above exercises.
4. Go to your fabric stash and put together some of those colour combinations you played with in exercise 2 and 3. Throw in a “pop” colour and see how it changes things? Hopefully you are starting to feel a little energised and are wanting to go beyond the theory and into the practical.
5. I have left this exercise till last because it is almost too obvious, look at Pinterest. But I am going to put some restriction of your search because we all know Pinterest can be overwhelming and the last thing we want is for you to find it all too much and lose interest. So only search for one type of quilt design eg black and white quilts, four patch quilts etc, you get the idea. Maybe step out of your comfort zone and search for art quilts or miniatures. Only spend half an hour on this exercise, has anything caught your attention?
I hope this has been helpful and you are now wanting to grab the rotary cutter and launch into a new patchwork project or even maybe revisit a UFO with new enthusiasm.
I find I revisit these exercises whenever I find myself in a creative rut, they help free up my mind to other possibilities.
Good luck and happy sewing
Margaret
Do I have enough? Just one more?
/
I recently listened to an American Patchwork and Quilting podcast about how patchworkers travel, and it got me thinking. In the podcast they talked about buying fabric, at your destination, that reflects the destination, about taking sewing with you to do in the car, plane and at the destination and about planning your holiday around quilt shops.
Ahh travel, a thing of the past thanks to COVID but I am hopeful to be able to travel again next year even if only within Australia.
As I have mentioned in a previous blog I have made several quilts about holiday destinations I have been to but there is still a problem I ponder each time I am getting ready to go on holiday, “how much sewing should I take or need?” The last thing I want to happen is to run out of sewing and find myself on a 6 hour train journey and no sewing.
Is the calculation 1 block per day or per week or 1 per plane trip or 1 per train trip. I know what you are saying “you can never have too much so just prep more”. But there is the issue of packing it and keeping it organised when you are packing and unpacking when traveling.
So what do I do? Firstly the calculation very much depends on what sort of a holiday you are going on, but I would usually prep at least one block per day and 2 to 4 for the travel to and from. When we Australian’s travel overseas we are usually on the plane for many hours.
When it comes to packing and keeping it all organised, I have a secret weapon, Jen Kingswell’s Block Wrap, https://www.jenkingwelldesigns.com/jens-block-wrap . It has room to lay out 6 blocks, keeps them tidy and ready to be sewn. As you finish a block take if out and lay out the next block therefore you always have 6 blocks at the ready. The rest of my block pieces I keep in letter size envelopes, well labelled and held together with a sturdy bulldog clip. Needles, tiny cutter and pins are all in a small needle wallet. I then put all these into a well labelled packing cell, neat, tidy and very easy to find in the suitcase.
I have photos of me sewing in all sorts of holiday destination eg Machu Picchu, Antarctica, Uluru. I have had to go into the hotel laundry to iron my block while staff watched on and I have finger pressed many a block until I could access an iron. It has all been fun and I think of all those experiences and places when I look at the blocks.
I hope this has given you some ideas for your next trip.
Here’s to travel and prepping our sewing and packing it lovingly ready for the big day, departure day.
Happy sewing wherever you are
Margaret
I sometimes cheat, do you?
/I sometimes cheat, do you?
I love tips and hacks that make my life easier, whether it’s cleaning, cooking and especially sewing. I believe if there is an easier way of doing something that gives you the same result embrace it. Is that cheating or just being smart with your time? I think definitely the latter.
I also love patchwork blocks on point, like the one below. I love the different pattern that is created when you flip a block onto it’s point. But there is a little more maths involved in this layout than a straight horizontal layout.
So with that in mind I decided to spend a little bit of time now to save time later. I have created a free downloadable cheat sheet for the set-in-triangles and corner triangles for on-point quilt layouts. I have done the maths from 4-inch blocks to 14-inch blocks.
Head over to the “Cheat Sheets” page, on my website, to download the chart for free, I keep mine in a resource folder as well as on my computer, so it is at hand whether I am at home or on a sewing weekend away.
I hope you find the cheat sheet helpful.
Happy sewing
Margaret

Help the rabbit has got my quilt
/Help the rabbit’s got my quilt.
As each of our 3 children approached their 21st birthday I started making them a quilt. I don’t think any of them actually received their quilt on their 21st but that is my MO, start late, finish late.
Our daughter is a Marine Biologist, so her quilt was an under the sea scene. Our youngest son was in the Army loading and unloading aircraft and doing a bit of jumping out of aircraft too so his quilt was called “Props” as it depicted propellors. Our middle child, another boy, was heavily into downhill mountain bike and dirt bike riding so his depicted hills, sky and sandy soil.
I am getting to the rabbit don’t worry. So as they each went their separate ways in life they took their quilts with them, all good they were made to be used. Our middle child partnered, bought a house and yes a rabbit, Storm, and then had a child of his own. So what did the rabbit do you ask. Well the rabbit died when their son was about 18 months old, very sad. Months later I noticed my son’s 21st birthday quilt in his son’s room, I was so happy to see it being used. When I commented on this fact my son and daughter-in-law both went very quiet and looked at the floor. Alarm bells started going off in my head, what have I said to evoke this response, what is wrong with the quilt?
Son finally made eye contact and told me that Storm, the rabbit, had eaten a hole in the quilt. Ok breathe Margaret breathe, it will be fixable, difficult to do considering the design but doable. “How big is the hole” I asked. Again son’s eyes went to the floor “pretty big, it goes all the way through”. I took a deep breath and decided now was not the time to take a look, I needed to get my head around the fact that I may not be able to repair it or if I can it might be very intricate and very time consuming.
So here I am 6 months down the track from that awkward conversation and confession. I have asked for a photo of the quilt damage as we are still in a COVID lockdown and I cannot go and see it in person.
Well the photo arrived. Is it as bad as I had imagined, yes and no. Is it fixable, yes it is but how it will look I don’t really know. I will have to introduce new fabrics as I don’t have any of the fabrics anymore I don’t think. How am I to attack this repair job. How did one cute, fluffy bunny do so much damage.
With son number two getting married April next year I am busy making a Wedding Ring quilt and I am determined to have it finished for the wedding, I will not be following my usual MO. The repair job might just have to wait until after April, it could be my Winter project.
The lesson to be learnt is; quilts are made to be used and when you use something there is always the potential for damage. So I will take that deep breath and come to terms with the fact that this might be the first but it will not be the last quilt that I will need to repair.
I will always look at this quilt and think of my son aged 21 on his mountain bike with his mates having the time of their lives but I will also think of Storm, the rabbit, and the love she gave my family and the headache, of a repair job, she has given me.
Wish me luck and patience.
Happy sewing and stay healthy
Margaret

Achieving in lockdown
/
So, what to sew during an extended lockdown.
I need no excuse to start a new quilt but I love when someone actually gives a me a reason to. We have a family wedding in April next year and my soon to be daughter-in-law has requested a Wedding Ring quilt. I am really enjoying the process of foundation piecing the arcs and have set myself the goal of 4 arcs per day, which of course is very achievable.
So as I started this new quilt I got thinking about the quilts I have made/finished during our previous lockdowns. I have enjoyed doing some relaxing hand piecing as well as some quick machine piecing. I have spent time designing and sewing new blocks as well as visiting some tried-and-true old favourites. One of the big challenges of lockdown, for me, is the fact that the patchwork shops are closed. I know this really shouldn’t be an issue as I do have a large stash of fabric, but you know how it is sometimes you just need a particular colour or design or size print that is not in your stash.
I have found lockdown to be a great time for scrappy quilts. One of the elements of scrap quilts that I really like is fussy cutting centres of blocks, I love getting my grandchildren to find the flowers or animals scattered around the quilt. Talking about grandchildren the pink quilt in the top left corner is my granddaughter’s first quilt, I have called it Pretty in Pink. The free pattern is available on my website and it is a quick and easy quilt to make.
I think I have made about 9 quilts during lockdowns, 7 of which are in the photo above. The blue, black and white quilt, middle top, was a mystery quilt designed by Laundry Basket Quilts, https://www.laundrybasketquilts.com/. I am in a sewing group of 5 so we challenged ourselves to make this quilt during lockdown 1. All 5 look a little different.
Middle row on the left is a panel I bought from Bella Fabrics, https://www.bellafabrics.com.au/, just before lockdown 2. I always like to cut up a panel and challenge myself with the maths of reconstructing it in another way.
The central, yellow quilt is a pattern I bought at a quilt show, ahhh remember them, from Sommerset Cottage, https://www.somersetpatchwork.com.au/. I love the cheeriness of the yellow background. I hand pieced this one and machine quilted it myself using our group’s quilting machine.
Bottom right is a section of my Cross Roads quilt another free pattern on my website. Again a quick and easy scrappy quilt.
The rectangular photos are very scrappy quilts. The bottom one all started with a block designed by Jen Kingwell, https://www.jenkingwelldesigns.com/, Mega Star. I made about 5 of the Mega Star blocks and then started designing my own blocks and the quilt just grew like topsy turvy. From that quilt I jumped into designing blocks for the other quilt, right hand side. This one has blocks named Beach Ball, Towel, Sea Star etc so I just had to name the quilt Summer.
I may be in lockdown but it does not mean I have to be glum or inactive or negative. Lockdown has given me time to finish quilts, start new ones and do some block designing. In years to come these lockdown quilts will comfort and warm family and friends and might even have them thinking about these difficult times and be thankfull that we all got through them.
Happy sewing and stay safe and healthy
Margaret
